Click to Learn More: What is a Self Authorization?
Two Actions & Workflows Possible
- Set up A + New Product Authorization
- New Authorization by Location (Refined Products' Terminal)
- New Authorization by Product
- One-by-One Self Authorizations
- Enabling 'By Location' Filter
- Enabling 'By Product' Filter
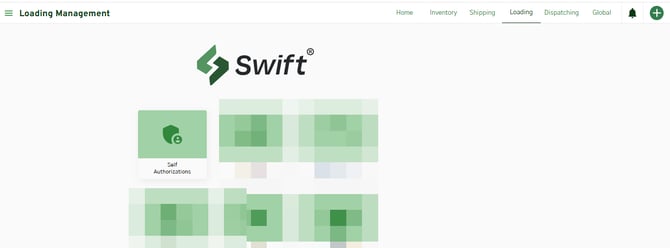
Self Authorizations are found within the Loading module from within Swift: https://swift.magellanlp.com/
1. Click on Self Authorization tile. (Swift > Loading Module > Self Authorization Tile)
ALL Product Enabling / Authorizations must
1. Start with Self Authorizations
2. Base Products must be enabled prior to Custom or Supplier-Directed Blend products.
+ New Self Authorization Workflow
Set up A New Product Authorization
- New Authorization by Location
- New Authorization by Product
Step One
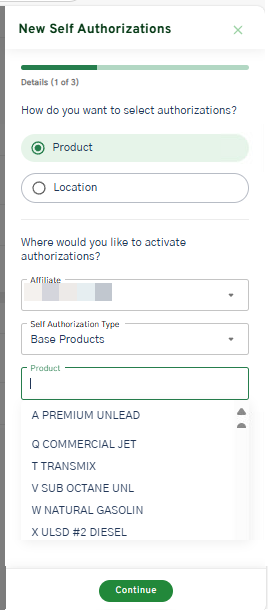
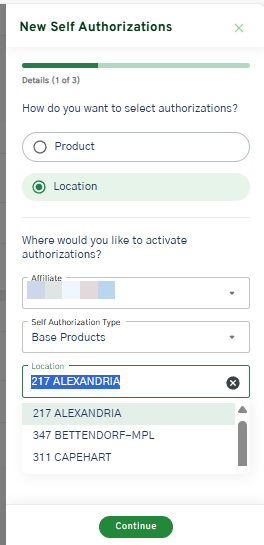
1. Within Self Authorizations module, click New Authorizations in the upper right-hand corner.

2. Select either Product or Location.
- Hint: If activating more products than terminals, select 'Products' to allow for bulk selection of products. Vice Versa: If activating more terminals than products, select 'Location.'
Base Products must be enabled prior to Custom or Supplier-Directed Blend.
3. Select 'Affiliate' in dropdown, if available.
4. Select 'Base Products.'
5. Begin typing any letter within the Base Product or select desired base product in the drop down.
6. Click Continue.
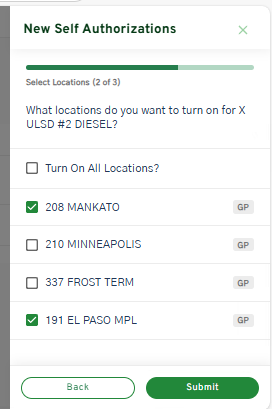
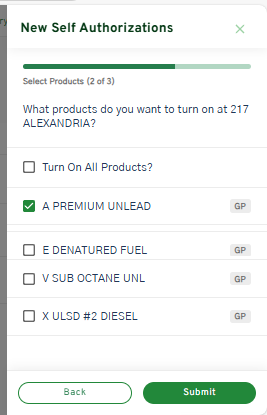
Step Two and Three
1. Select applicable products or applicable locations to authorize (enable). Users can also select 'Turn on All Locations?' or 'Turn on all Products? for a bulk activation.
2. Click Submit.
The next step ('3 of 3') is confirmation and submission.
Once Base products are setup and authorized, users can begin to authorize Custom or Supplier-Directed Blend Products.
Use the above steps, but select either Custom Products' or 'Supplier-Directed Blend.'
What's the Difference between the Custom and Supplier-Directed Blend? Read Product Type Definitions.
Don't see a product in Swift? Email productservices@oneok.com
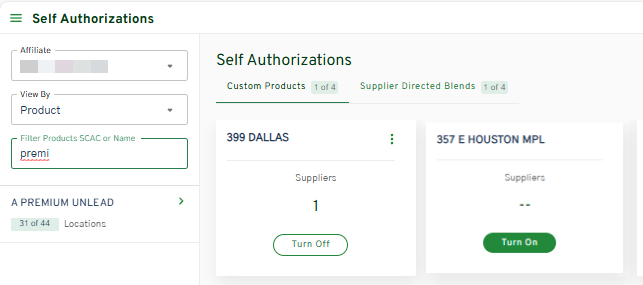
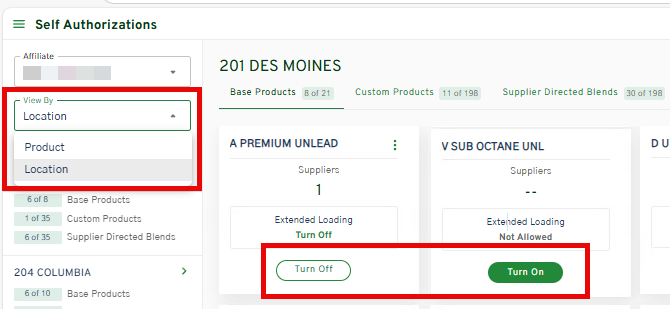
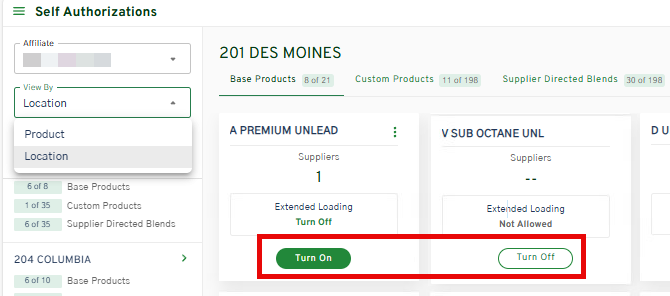
After products are enabled, user can verify by navigating to the main Self Authorization card screen. Use the filters on the upper left-hand corner.
Turn Off = Authorized | Turn On = Not Authorized
One-by-One Set Up
From the main Self Authorization on Overview Page.
Enabling 'By Location' Filter
- Select View by Location in the dropdown and type in the ONEOK Refined Product terminal either by name or Location ID.
- Select the location on the left-hand side.
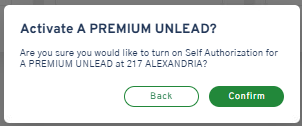
- Click Turn On for the necessary base products under the Base Products Tab.
- Click Turn On for the necessary products under the Custom Products tab or Supplier Directed Blend tab.
- Click Confirm.

Enabling 'By Product' Filter
- Select View by Product in the dropdown and begin typing either Product Letter or Product name in the 'Filter Products.'
- Select the product on the left-hand side.
- Click Turn On to enable the product at a specific location. This process is a one-by-enable workflow.
- Click Turn On for the necessary products under the Custom Products tab or Supplier Directed Blend tab.
- Click Confirm.